Wednesday, May 17, 2023

May 2023 Card Layout #2

 May 2023 Card Layout #2
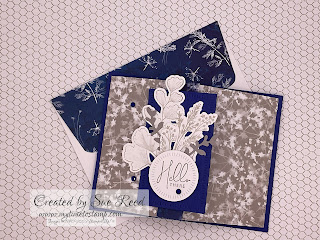
SU’s Irresistible Blooms Bundle and Hello, Irresistible DSP

Great layout so show off this DSP. I was lucky to have some retired Lost Lagoon ribbon and some retired Pretty Peacock rhinestones to add. There is a new ribbon called Lost Lagoon Bordered Ribbon in the annual catalog as well as Tinsel Gems in both Lost Lagoon and Pretty Peacock. And Adhesive-Backed Sequins Trio for Pretty Peacock.


Measurements:
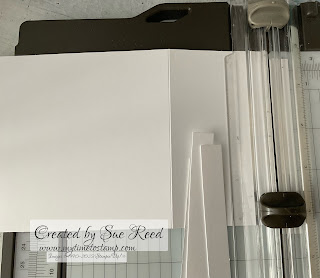
  • 5 1/2” x 8 1/2” cardstock, scored at 4 1/4” and folded on the score line for the card base.
  • 4” x 5 1/4” cardstock for panel for the card front.
  • A scrap of matching cardstock.
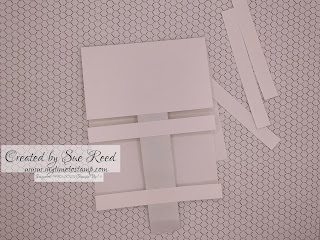
  • DSP 2 1/4” x 5” and 1 1/2” x 5; 2 1/4 x 6” panel for the envelope
  • 4” x 5 1/4” white cardstock for inside of card; scraps of white for leaves and sentiment
  • 5 3/4” piece of ribbon
Directions:
  • Adhere the DSP panels to the cardstock panel for the card front.
  • Add ribbon on the seam and adhere to back of cardstock with tape.
  • Adhere the DSP panel to the card front.
  • Stamp sentiment on white cardstock scrap and punch out with the double oval punch. Punch out the larger oval from the matching cardstock scrap. Adhere the sentiment to the larger oval. Adhere to card front with dimensionals. 
  • Stamp leaves on the white cardstock scrap and die cut. Adhere to card front with dimensionals.
  • Adhere the DSP panel to the envelope flap and trim.
  • Add embellishements.
You can find the SU products needed to make this card in my Online Store
 
SUProducts:
  • Irresistible Blooms Bundle 161151
  • Helllo, Irresistible DSP 161139
  • Lost Lagoon Cardstock 133679
  • Pretty Peacock Cardstock 150880
  • Basic White Cardstock 159276
  • Lost Lagoon Bordered Ribbon 161171
  • Tinsel Gems: For Lost Lagoon 161624; for Pretty Peacock 161623 
  • Or Adhesive-Backed Sequins Trio for Pretty Peacock 161206

Friday, May 5, 2023

May 2023 Card Layout #1

 May 2023 Card Layout #1
SU’s Countryside Corners Bundle, Something Fancy Dies and Countryside Inn DSP

The card challenge was to make a strip card so I made two different versions. One a simpler version and one stepped up version. Love this DSP!! All those blues!!

Here is the simpler version:


And here is the stepped up version:


Measurements:
  • 5 1/2” x 8 1/2” cardstock, scored at 4 1/4” and fold on the score line to make the card base.
  • Two @ 4” x 5 1/4” cardstock-one for the inside
  • Several strips of patterned paper cut at different widths and about at least 5 inches long.
  • 2 1/2” x 6” panel for the envelope flap.
  • White cardstock scrap for sentiment,
  • Vellum scrap.
  • Embellishments of your choice.
Directions:
  • Adhere strips of patterned paper to one of the white cardstock panels. Trim off excess.
  • For the simple version: Adhere the panel to the card front. Stamp the sentiment on the white cardstock scrap and die cut it with the smaller die from the Something Fancy Dies. Die cut the vellum scrap with the larger die from the Something Fancy Dies. Adhere the sentiment to the vellum. Add to card front with dimensionals.
  • For the stepped up version: Die cut the strip panel with 2 layering dies from the Countryside Corners Dies. Add the card strip die cut to the card front with dimentsionals. Follow the same directions for the sentiment and vellum layers as in the simple version but adhere without using dimensionals.
  • Add embellishments.
  • Adhere the other white panel to the inside of the card.
  • Adhere the patterned paper panel to the envelope flap and trim.
The SU products used to make this card can be found in my Online Store

SU Products:

Friday, April 14, 2023

April 2023 Card Layout #8

 April 2023 Card Layout #8
SU’s Rhino Ready Stamp Set and Flowers and More DSP
Tag Fun Fold Card

A fun fold using the cute rhino image from SU’s Rhino Ready Stamp Set and SU’s vibrant colors Tahitian Tide and Parakeet Party. 


Measurements: 
  • 4 1/4” x 11” cardstock
  • 3 3/4” x 4”; a 4” square; and 2 1/2” x 6” DSP for the envelope flap
  • 2 1/2” x 4” white cardstock, scraps for images and sentiment
Directions: 
  • Score the cardstock panel at 4” and 6 3/4”. Fold accordion style.with the larger panel for the bottom of the card base.
  • Adhere the 4” square DSP to the bottom panel. 
  • Corner punch the top panel of the card base. Corner punch the 3 3/4” x 4” at the top. Adhere it to the top panel of the card base. 
  • Stamp image and/or sentiment to white cardstock panel and adhere it to the inside panel of the card base.
  • Stamp/color and die cut images and adhere them with dimensionals to the top panel of the card base. (I used alcohol markers to color my images.)
  •  Stamp a sentiment on a label or shape and adhere to the top panel of the card base.
  • Punch a hole at the top and add ribbon to make the tag.
  • Adhere the DSP to the envelope flap and trim.
Products needed to make this card can be found in my Online Store
  • Rhino Ready Stamp Set 160959
  • Flowers and More DSP 160802
  • Tahitian Tide Cardstock 159261
  • Basic White Cardstock 159276
  • 1/8” Metallic Woven Ribbon Parakeet Party 159196 and Tahitian Tide 159197

Thursday, April 13, 2023

April 2023 Card Layout #7

 April 2023 Card Layout #7
SU’s Covered in Sunshine Stamp Set, Desert Details Dies and Fancy Flora DSP

A very simple layout to show off the beautiful sentiment from the Covered in Sunshine stamp set.


Measurements:
  • 5 1/2” x 8 1/2” cardstock, scored at 4 1/4” and folded to make the card base.
  • 4” x 5 1/4” cardstock layer
  • Cut four strips at 3/4” x 4” all DSP or a combination of colored cardstock and coordinating DSP
  • Cut 2 1/2” x 6” panel of DSP for the envelope and 1/2” x 4” strip for inside of card.
  • White cardstock about 2 1/2” x 4” for label and 4 x 5 1/4” for inside
Directions: 
  • Adhere the four DSP strips to the cardstock layer.
  • Use a positioning tool and Stampin’ Write markers to stamp the sentiment on white cardstock for the label. Die cut label with die from the Desert Details dies. (The label should be big enough to cover the four 3/4” strips.)
  • Adhere label with dimensionals to the cardstock layer.
  • Adhere the cardstock layer to the card front. 
  • Adhere the trim strip of DSP to the inside white cardstock layer. Adhere the white cardstock layer to the inside of the card.
  • Adhere the DSP envelope panel to the envelope flap and trim.
The products needed to make this card can be found in my Online Store

Products: 
  • Covered In Sunshine stamp set 160726
  • Desert Details 160531
  • Fancy Flora DSP 160413
  • Soft Sea Foam cardstock 146988
  • Calypso Coral cardstock 122925 
  • Pool Party cardstock 122924 
  • Fresh Freesia cardstock 155613 
  • Subtles Stampin’ Write Marker Assortments 147156 
  • Basic Gray Stampin’ Write marker
  • Basic White cardstock 159276

Monday, April 10, 2023

April 2023 Card Layout #6, Part 2

April Card Layout #6, Part 2
SU’s Desert Details Bundle and Delicate Desert DSP.

This fun fold card is sometimes called the lattice split card or lattice front card. For my first version in part 1,  I used SU’s Nature’s Prints Bundle and Sun Prints DSP. Be sure to go to my blog post for part 1 of this fun fold for measurements and pictures to help with the construction of this layout. 

After thinking about this fun fold, I wanted to make the fence look like the fences we have for our horses. Many of the fence posts are railroad ties-pretty much a solid rectangle piece of wood treated with creosote, a black tar like substance. Here is my version.


For this version of the lattice front card, I started with 8” x 4 1/4” card base, scored 
at 5 1/2”. I used SU’s blending brushes to make a sunrise/sunset to the top portion of the card front with SU’s Classic Stampin’ Pads for Mango Melody, Cajun Craze, Calypso Coral, and Pumpkin Pie.

I die cut nine strips of Soft Suede cardstock about 4 1/2” long using the die from the Desert Details Bundle. Then use a sponge dauber and Soft Suede ink to darken each strip to look like creosote. Next put a piece of painter’s tape down back side of the top of the card front.  Add 5 of the strips to the sticky side of the painter’s tape starting with the first strip line up with the bottom of the card. (Post It Labeling and Coverup Tape can be used also.)

Adhere two strips side by side to the 5 strips with liquid adhesive to make each of the fence posts look wide like railroad ties. After the adhesive dried, I removed the painter’s tape and trimmed the excess from the ends of the fence posts. 

I added a 4 1/4” x 5 1/2” piece of Desert DSP to the inside of the card so that it would show through the picket fence like a green pasture. I stamped and die cut images for the card front and added some embellishments. I adhered and trimmed a  2 1/2” x  6” panel of DSP to the envelope flap.


April 2023 Card Layout #6 Part 1

 April 2023 Card Layout #6 Part 1
SU’s Nature’s Prints Bundle and Sun Prints DSP

This layout has been very popular lately on many blog posts and on Pinterest. It is sometimes called the lattice split card or lattice front card. I started with SU’s Nature’s Prints. (Stay tuned for another version of this layout part 2.)


Start with an 4 1/4 x 11 card base. Score at 5 1/2”. Then cut six strips 1/2” x 4 1/4” wide from one end. 


Then add a strip of painters tape to the front of the card base with the sticky side up. (I used Post-It Labeling and Cover-up Tape.)
 

Next place one of the six 1/2” strips at the bottom of the card front. The sticky side of the tape will hold it in place.


Add three more 1/2” strips starting at the top and positioning the strips to make the picket fence.


Use the last two 1 /2” strips as the picket fence posts. Adhere them to the four picket fence pieces. I used a small dot of liquid adhesive on each of the fence pieces to hold the fence posts in place.


Allow the glue to dry, and then remove the painter’s tape carefully. Add stamped/die cut images and sentiment.

It’s optional to adhere a 3 1/8” x 4 1/4” panel of DSP to the back of the picket fence pieces for a background or leave the fence open. You can also add a piece of DSP to the inside of the card base.

Saturday, April 8, 2023

April 2023 Card Layout #5

 April 2023 Card Layout #5
SU’s Nature’s Prints Bundle and Sun Prints DSP

A great fun fold for using Stampin’ Up! designer series paper.  Two versions have been included in this post, each one showing one side of the double sided Sun Prints DSP. Plus you can get 3 cards from one sheet of DSP.


Measurements:
  • 4” x 12” double sided paper; 2 1/2” x 6” for envelope flap
  • 4 1/4” x 5 1/2” cardstock for card base
  • 3 3/4” x 5” neutral cardstock for inside
  • Cardstock scraps for stamping and die cutting images.
Directions:
  • Score the double sided paper at 3/4”, 3 1/2”, and 8 3/4”. Fold and glue down the most narrow panel.
  • Adhere the double sided paper to the card base.
  • Stamp and adhere the neutral panel to the inside.
  • Die cut a focal shape (rectangle, circle, square, label).
  • Stamp and die cut images. Adhere to the focal shape.
  • Adhere double sided paper to the envelope flap and trim.
The products used to design this card can be found in my Online Store

Products: For the first version of the card.
  • Nature’s Prints Bundle 158801 
  • Sun Prints DSP 158790 (available until May 1, 2023, until supplies last)
  • Gray Granite cardstock 146983
  • Starry Sky cardstock 159263
  • Basic White cardstock 159276
  • Fern 3D Embossing Folder 158804
  • Starry Sky Classic Stampin’ Pad 159212
  • Basic Stampin’ Emboss Powders 155554
  • Solid Faceted Gems 159189

May 2023 Card Layout #2

 May 2023 Card Layout #2 SU’s Irresistible Blooms Bundle and Hello, Irresistible DSP Great layout so show off this DSP. I was lucky to have ...